Tuesday, November 12, 2013

My Favorite Roasted Chicken!!

This is hands down my favorite chicken recipes.  I modified it from a Jamie Oliver recipe.  Not only is the chicken incredible the potatoes are amazing.  My sister honestly said she would "kill someone for these potatoes."  If you know her, that is saying something.  Because of the two of us, she is far more stable.

I like this chicken best in the summer with some fresh herbs from the garden, but fresh herbs from the store aren't horrible and dried will do in a pinch.  These particular pictures are from the summer.  Seeing the tomatoes and remembering this amazing meal makes my mouth water.  Sadly, I have a long time to wait for those real tomatoes again.  But waiting is probably what makes them taste so good.


This is what I have acquired after "shopping" outside.  Being the Farmers Daughter has some real perks!!  For the chicken I am preparing I have gathered rosemary, parsley, and thyme, onions, garlic, and potatoes.


This is my bird. I like to finish defrosting my chickens in a little salt water.  That draws out any extra blood and makes the bird juicy and tender.  Just cover your bird with cold water and add 3 or 4 tablespoons of salt.  I usually use kosher salt. 


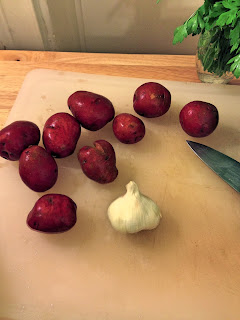
Scrub 2 pounds of potatoes and break the head of garlic into cloves.  But you don't have to peel them.  


Put the potatoes and garlic in a large pot and cover with water.  Bring to a boil.  You want them so that you can get a fork in the potatoes but they are not ready to eat.   Boil for about 5-10 minutes.


Meanwhile, wash dry and roughly chop up all of your herbs. I have used rosemary, thyme, and parsley.  This is what I have on hand, and a combination I really like.  But I also think sage or oregano could be a nice addition.  Sage would be really nice in the fall.


With a fork, mash your herbs into 2 sticks of unsalted butter.  Add some sea salt and some fresh black pepper.  You could also use coconut oil, or lard.  The fat is used to hold the herbs on bird and flavor to the potatoes below.  I have tried olive oil and found that it doesn't hold the herbs on as well as the butter.


Drain your potatoes and garlic and then throw them into the bottom of your roasting pan.  Add some sliced onion.  Because onions and garlic make anything better.


Place your bird on top of the bed of potatoes, onions, and garlic.  Smear your herbs and butter all over the breast.  You might have to take some paper towels and wipe off any excess water. With the water removed the butter will be able to really stick.  Cover and put your roaster in and 400 degree oven for about an hour and a half.  The time depends on how big your bird is.  I think this was a 6 pound bird and it took almost 2 hours.  


When your bird is golden and delicious, transfer it to a board or plate to be carved and then scoop out the delicious potatoes garlic and onion.  To check the doneness of your bird look for clear juices when you stick the thickest part 


This was our dinner that night.  Delicious!!!  We also had an amazing tomato salad with mozzarella and sautéed zucchini! Notice how Dad has a fork in his hand.  


Pretty picture of the salad.  I was particularly proud of myself because while my food always tastes good, it doesn't always look this pretty.  


My plate! Seriously my mouth is watering as I type!


We always make sandwiches with the leftovers, and then I make broth with the bones! Nothing goes to waste!


This picture is just torture!  

Thursday, August 15, 2013

The Farmer's Daughter is back on the Farm!!

My Grandfather passes away at the end of last year.  He was 89.  While he is missed daily, I do take comfort that he lived a long and full life.  Something he made very clear was that my family were to be the next tenets in the house.  Pappap and Nana would both make jokes about how they thought about cleaning out a drawer or getting rid of something and thought they would just leave that for the next person.  And that person is me.  Luckily, I have always wanted to live here, and even luckier, is that my husband is willing to take this on.

Often times people ask me if it's weird to have a conversations that plan for a future where one of the participants is no longer with us.  We are a family farm.   I am generation eight to live on this farm.  My children are generation nine.  That doesn't just happen without planning for the future.  Also, I take comfort in knowing that I am fulfilling the wishes of my grandfather.  Even if some of the wishes involve leaving up huge museum style portraits of generation two in the parlor.  I have decided that they are no longer looking at me and, I should just engage them in conversation.

As farmers we know that death is a part of life.  It really is that simple.  I believe that our time hear on Earth is limited and we need to make the most of it.

So with all of that said, the Farmer's Daughter is back on the Farm!!


Our neighbors may now be chickens but, this is not a bad view to wake up to in the morning!!


Tuesday, June 19, 2012

Caramelized Onions!!

Something that I have received many compliments over the years is caramelized onions.  I love them.  I could honestly eat them with a spoon and have on several occasions.  They are a wonderful addition to anything.  I almost always put them on pizza, but they are wonderful on Italian Sausages on the grill.  You know a nice soft roll, wonderful sausage, caramelized onions, a squirt of mustard, now that is a picnic!!  In my opinion they are a perfect condiment.  Many people say "Oh, I don't like onions."  Well they clearly have not had these.  They are sweet and delicious!


It takes a lot of onions.  I always like to have extra.  They keep great in the fridge and are excellent reheated.  If I am not sure on whether or not that is enough I always grab another. In these photos I have used "yellow onions" I believe there are about 3 pounds here.  But you can use your onion of choice.  I love red onions, Vidalia onions, those big white ones, really there isn't an onion I wouldn't slice thinly and throw in a pan. 


My giant pile of onions.  You can see my chef's knife in the picture to give you some perspective.  This is a big cutting board.  It's bigger than a half sheet pan. 


It doesn't take much oil just a little to get them started.  I live to use olive oil.  As I have said in previous posts I like the taste of butter.  I have seen TV chefs put both in.  I worked in a place where they just used a pound of butter.  Now it was about 20 pounds of onions, but they were delicious.  So add the fat to suit your fancy. 


I put mine in when the oil is hot, but not smoking.  I like high heat to really get them going, until they start sizzling. Then you stir and turn them back. You have to be patient or you will burn them. There is a fine art between letting the pan do it's job and keeping them from burning. My knob goes from 1-10.  Ten is Ultra High.  In this picture I am sure my knob was on Ultra High until I stir them the first time then it goes to 9.


It is at this stage where your variety of onion comes into play.  Some are more dry than others.  This just depends on the time of year and where they are grown.  Vidalias are typically more watery than most.  So sometimes you have to cook the water off so they will brown.  You need to stir gently in this case because you could break them up too much and they will disintegrate. My knob is at 8 but about to move down to 7.


On my range 6 is my sweet spot.  This picture is steamy, and you can see that pile is disappearing right before our eyes.  They spend some time at 6.  But I keep stirring.  It's almost like everyone need their turn on the bottom of the pan to get brown.  So I am just gently exchanging places. You will have to find your sweet spot on your range.  I have a harder time making them in another kitchen just because I am unfamiliar with how high their high is and so on. 


Once they get to this color, I move from 6 on down.


These last 2 pictures there is more time lapse than the others.  It does take time.  You just have to stir and turn them down the slightest bit each time.  I work mine all the way down to low. This picture is probably at 4 on it's way to 2.


Here they are.  Yum!

Tuesday, May 15, 2012

Strawberry Jam

I like to can. I am a person who reads labels, not necessarily nutrition labels but I read the ingredient list.  I avoid too many things I can not pronounce.  This is another reason I can.  I know what is in that jar, because I put it in there.  I like the idea of preserving something for my family to enjoy later.  When I break out a jar of strawberry jam at Christmas, I will think of the wonderful time we had picking these berries.  My Mom always canned when we were growing up.  She still does.  My daughter prefers Memie's Pickles over mine, even though I use the same recipe.  I think she likes Memie's pickles because they are served at Memie's  house.  When Tudor Hall Farm was considering processing foods for sale, I took a class and received  an acidified foods certification.  So this is another way for me to put my training to good use. 


 I am a person who likes to experiment when cooking, I like to try new things on the fly.  However when it comes to canning, this is not advised.  You need a real tried and true recipe, and you need to follow it.  The chemistry in that recipe is manipulating the biology of the bacteria.  It is most likely preventing their growth by creating an environment in which they can not survive.  And then killing them when it comes to the "processing" part of the recipe.  If you really want to use Grandma's recipe, then I would encourage you to check it against the current USDA guidelines.  Most likely it's ok.  The art of home canning has really not changed too much.  By controlling the amount of water in the jar or the pH of the liquid you are keeping bacteria at bay.  


I am using a recipe from the Ball Blue Book of Preserving. Copyright 2006 The Ball Blue Book was first published in 1909. I feel they know what they are doing.  The ISBN of my book is 0-9727537-0-2. If you are considering canning this is a wonderful resource.  It also has guidelines on dehydrating and freezing.  The recipe I am using is on page 34 entitled Strawberry Jam.  I am using the one with just no added pectin.  

Strawberry Jam

Yield about 4 pints
No added Pectin

2 Quarts Strawberries
6 cups Sugar

Wash strawberries; drain. Remove stems. Crush strawberries one layer at a time. Combine strawberries, and sugar in a large saucepot.  Bring slowly to a boil, stirring until the sugar dissolves.  Cook rapidly to gelling point.  As mixture thickens, stir frequently to prevent sticking.  Remove from heat.  Skim foam if necessary.  Ladle hot jam into hot jars, leaving 1/4-inch headspace.  Adjust two-piece caps.  Process 15 minutes in a boiling-water canner.  


Here are my breathtakingly beautiful berries!! When my husband got home from work the kids and I were chowing down on berries.  I offered him one and he said "No thank you I don't really like strawberries."  And I said "But these are 'Real' Strawberries."  And he tried one and he was amazed at how wonderful they are.  Seriously run out and find a patch!!!


My washed berries.  


My cut up berries that have been smashed a bit with the sugar. I made 4x the recipe.  This pot is HUGE! I used 8 quarts of berries and 24 cups of sugar.  


Here you can still see the granuals of sugar.  It has not yet come to a boil.  You want this to be a slower process because it can get too hot too quick and stick and then scorch and then you have to cry because you have ruined it.  Maybe you don't have to cry, but I do. Keep stirring it.  Once it does come to a boil make sure you turn down the heat.  Then stir it often.  It can boil over and make a MESS!  So make sure you are attentive.  I turned mine down a little bit each time I stirred it.  


These are the strawberry pieces floating on top of the liquid.  That is how the sugar is preserving the fruit.  The sugar draws out the moisture in the berry and then the heat is boiling off that liquid.  The bacteria that cause spoilage need that water to live.  Adding the sugar to draw out the liquid and the heat to remove the water is creating an environment in which the bacteria can not survive.  So if the thought has entered your head "Wow this is a lot of sugar, I bet I could save a few calories by not putting in as much." Why yes you could save yourself some calories, however you also run the risk of your jam not keeping.  And if you do eat it, you could give yourself food poisoning.  This is why you stick to the recipe!!


This is my jam all cooked down.  I need to skim off all the foam.  It has reached the gelling point. I tried to get a picture of it but then steam kept fogging up the camera.  You can just see it.  When you stir it it looks glossy and like jam. Once it is ready you can start sterilizing your jars.  


These are my jars being filled.  You need to work rather quickly so I did not get many pictures taken.  I will do better next time.  I plan on lots of canning.  Again the Ball Blue Book of Preserving goes into detail of how to prepare your jars.  You need clean jars that are warm.  Putting boiling jam into a cold jar could shock the glass causing it to break.  And well that is a mess you do not want.  Broken glass and sticky jam is just not a good scene.  My Mom always stressed the importance of a good seal.  This "good seal" can not be achieved if the lip of your jar is not smooth.  So run your finger around the top of each jar checking for chips or old food to be removed during the washing and sanitizing portion of your jar prep.


I have this nice funnel that measures the 1/4 inch head space for me.  When you process them the liquid will heat up and expand.  You do not want it to escape the jar.  If it would escape the jar you run the risk of not creating a "good seal." So leaving room for the liquid to expand but not escaping the jar is a good idea. 


Here are my jars filled. Again I am trying to work quickly.


I have now put the lids and rings on them.  I think many people call them different things.  My Mom calls them lids and rings, but on the box they are called bands and lids.  And I have another friend who calls them   rims and lids.  No matter what you call them you boil the lids to soften the rubber and then screw the ring on.  You want to make sure it's taunt but not too tight.  Again you have to leave room for the expanding and contracting of the glass jar when they are in the canner.  


This is my first batch coming out of the canner.  You place the jars in the canner so that they are not touching.  Cover them with about 2 inches of water.  Once the water has come to a boil you start a timer for 15 minutes.  Once the timer is finished you can remove the jars from the canner and start on the next batch.


My final batch.


My jam cooling.  You can see that they are already starting to seal.  There is a dimple in the lid.  Hearing the jars seal is music to my ears.  That is how this ring and lid system works.  As the hot liquid cools it condenses and creates a vacuum seal.  So if you don't have a smooth surface for the rubber lid to adhere to you will not achieve the "good seal."


My beautiful jam.

Monday, May 14, 2012

Mother's Day Meatloaf

Mother's Day is a wonderful day!  I think my favorite part is just being together and expectation of a slow day.  I will admit it has taken on new meaning since I have become a Mother.  This is my first Mother's Day as a Mother of three.  This year my daughter was really into it.  She is really into all holidays.  As soon as one is over she asks which one is next and we count the days on her calendar.  But this year she was particularly funny.  When I was opening some cards I received in the mail, she wanted to let me know that she "didn't know" if I was going to receive a card and present from "Daddy and Us."  That is right.  She 'just didn't know" if I was going to get a present.  She told me this several times with the biggest smile on her face.  Then later when I recanted to the story for my husband, she leaned over and in a stage whisper said "remember I am not supposed to tell." Ha! Gotta love four year olds!


This is the Meatloaf that I made for my dear Mother.  My Father enjoyed it as well. 

For this recipe I used:

2 lbs. Tudor Hall Farm Ground Beef
1 lb.  Tudor Hall Farm Sweet Italian Sausage
2 Tudor Hall Farm Free Range Eggs
1 15oz  can of diced tomatoes
1 large onion
1/2 a sleeve of crackers
4 cloves of garlic
1/2 c chopped fresh Oregano
2 Tablespoons dried Rosemary
2 Tablespoons dried Thyme
2 Teaspoons Smoked Paprika
2 Teaspoons Cumin
salt and pepper


This is my meat defrosted.  2 pounds of ground beef, and a pound of Sweet Italian Sausage


Sometimes I use loose sausage, but most time I just take it out of the casings.  


These are some of my spices.  I accidentally dropped the onion in the bowl and then the cumin and smoked paprika were an after thought.  That is often how I cook.  I have this light bulb moment "Oooh you know what would be really good" and then I dump some in.  I like to use fresh herbs when I have them.  But right now on my deck I just have oregano that wintered over.  I need to put out my other herbs. One more thing to add to my to-do list.  


The onions!


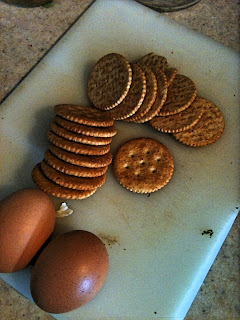
The crackers and those beautiful brown eggs. I just smash up the crackers with my hand when I am about to throw them in the bowl.  I know there are many methods with a rolling pin and plastic bag and all kinds of stuff.  I don't have time for that or a desire to clean it up.  So I just smash it with my hands. You could easily use bread crumbs here.  I do often use bread crumbs, but I am out.  You could even use oatmeal. I had the crackers out because when I was making this we were eating cheese and crackers. No need for a trip to the pantry when these are right beside me.  


This is everything in the bowl.  You can see in the upper left the smoked paprika and then the cumin to it's bottom left.  I really like smoked paprika and cumin. Honestly I have not found a seasoning or spice that I don't like.  But these in particular add a richness.  You can't tell they are there but if they weren't you'd miss them. 


I think nothing works better than a good clean hand for mixing this up.  You want to make sure things are mixed through, but do not over mix.  Over mixing can toughen it up.  


This is my loaf in the pan.  I used a 13 x 9 baking dish.  I did spray it with some non-stick cooking spray.  


This is a big can of tomatoes that I dumped over them.  It gives it a little extra juice too. Then place uncovered in a 350 degree oven for about an hour. Or until it's done.  


Hot out of the oven!


My husband made mashed potatoes.  He mashed these by hand.  He comes from a family with very high standards for mashed potatoes.  I encourage him to demonstrate. These were some of his best.


Green beans.  These just slowly cooked in my dutch oven on the back burner for a long time.  They are just frozen beans with my chicken stock and an onion, salt and pepper.  Super easy! They just cook as you are doing the rest. 


Dad's Salad Greens.  I made a vinaigrette from olive oil and this Lavender Balsamic Vinegar good friends gave me.  It's really good.  


My plate.  Can you tell I was hungry?


Dessert.  This is Hot Milk Sponge Cake with Strawberries.  The kids and I went with my cousin to pick some local berries.  I made jam with the bulk of them, but these were some left over.  The Hot Milk Sponge Cake is a recipe that my great grandmother used.  It's simple and you just can't beat it. 
Happy Mother's Day!